.png)
Moonlight Safari
Age: 2 years old
Class Size: 15 children
No. of Lesson: 4 classes in the whole course
Lesson Duration: 1 hour
Preparation
1. Collect images and toys of trains, tickets, stations, rails, and traffic lights.
2. Set up a train-themed craft station with materials for creating paper trains, including colored paper, glue, and safety scissors.
3. Prepare the story "Let's Take the Train" for reading and interactive activities.
Part 1: Story Introduction and Vocabulary
Target Vocabulary:
- ostrich
- parrot
- rhino
- camel
- giraffe
Target Instruction:
- "Where is the [object]?"
- " What is the boy/grandpa doing?"
Learning Objectives:
By the end of the lesson, students should be able to:
1. Recognize and name the animals introduced in the story: ostrich, parrot, rhino, camel, giraffe.
2. Respond to simple questions involving the target questions "Where is the [object]?" and
"What is the boy/grandpa doing?"
3. Demonstrate understanding of the story by idenHfying animals and acHons.
Materials List:
- The book "A Night at the Zoo"
- Animal flashcards featuring an ostrich, parrot, rhino, camel, and giraffe
- Props or toys representing the target vocabulary animals (optional)
### Class Details:
1. Warm-Up (5 mins): Start with an animal-themed song that includes movements, such as "Walking Through the Zoo" or "We're Going to See the Animals," to engage the children and introduce the context of the zoo.
2. Story Introduction (5 mins): Show the cover of "A Night at the Zoo" and ask the children what they see. Introduce the title and the concept of a zoo at night. Briefly discuss what animals they might find at the zoo.
3. Vocabulary Introduction (10 mins): Using the animal flashcards, introduce each of the target vocabulary words: ostrich, parrot, rhino, camel, giraffe. Show the flashcard, say the animal's name, and encourage the children to repeat after you. Use the props or toys to help the children associate the word with the animal.
4. Interactive Reading (15 mins):Begin reading "A Night at the Zoo." Pause frequently to point out the animals and ask "Where is the [animal]?" Allow the children to answer and then confirm by pointing to the animal in the book. Also, pause to ask "What is the boy/grandpa doing?" and discuss the actions in the story.
Extension. Question and Answer Activity (10 mins):Refer to illustrations in the book and ask, "Where is the [animal]?" and guide the children to respond with "The [animal] is at the zoo." Next, use a simple figure or doll to represent the boy/grandpa and ask, "What is the boy/grandpa doing?" Act out simple actions with the figure, such as walking or looking, to help children learn action verbs.
Assessment:
Remarks:
- Be animated and enthusiastic when introducing the animals and reading the story to capture the children's attention.
- Encourage the children to use gestures or act out the animals and actions to reinforce learning.
- Repeat the target vocabulary and questions frequently to aid retention.
- Adjust the pace of the lesson based on the children's engagement and understanding.
Part 2: Art and Craft Activity
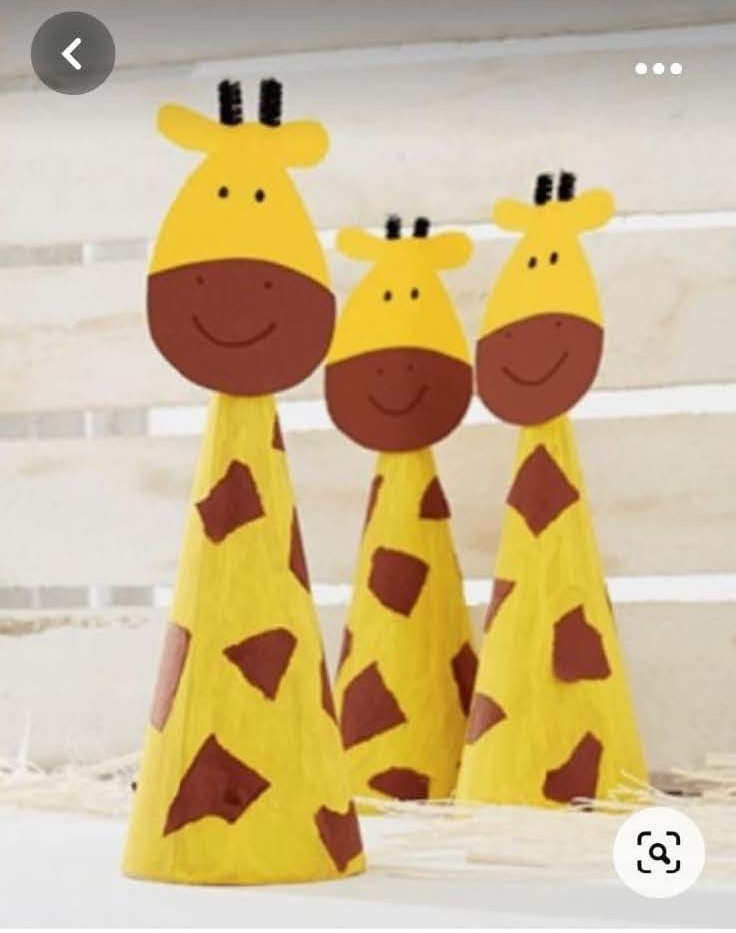
Creating Giraffe Models
Learning Objectives:
By the end of this activity, students should be able to:
1. Follow a multi-step process to create a giraffe model using various art materials.
2. Develop fine motor skills by cutting, painting, and assembling their art projects.
3. Recognize colours and shapes associated with the giraffe.
Materials List:
- Cardboard cones or paper to roll into a cone shape
- Yellow and brown paint
- Paintbrushes
- Yellow construction paper
- Brown snouts cut from construction paper
- Pipe cleaners or clay for giraffe ossicones (horns)
- Googly eyes or black markers for eyes, nose, and mouth
- Glue
- Scissors (for teacher use or with close supervision)
Class Details:
1. Introduction (5 mins): Show an example of the finished giraffe craft and explain each part of the giraffe that they will make. Discuss the colours and shapes they will use.
2. Painting the Cones (10 mins): Have the children paint their cardboard cones yellow. While the cones are drying, they can paint brown patches onto their yellow construction paper, which will be used for the giraffe's ears and ossicones.
3. Creating Giraffe Features (15 mins): While paint is still drying, help the children cut out ear shapes from the yellow construction paper with brown patches. Use pipe cleaners or clay to shape the giraffe's ossicones. Then, cut out a brown snout for each giraffe.
4. Assembling the Giraffe (15 mins): Once the paint has dried, assist the children in gluing the snout, ears, and ossicones onto the cone. Then, they can draw eyes, nose, and mouth with a black marker or stick on googly eyes.
5. Clean-Up (5 mins): Guide the children through cleaning up their work area, putting away materials, and washing their hands after the craft activity.
Assessment:
- Observe if the children can follow the step-by-step instrucHons to create the giraffe model.
- Assess their motor skills as they cut, paint, and glue the different materials.
- Evaluate their ability to recognize the colours and shapes associated with the giraffe.
Notes for Teachers:
- Use simple language and demonstrate each step before having the children try.
- Encourage the children to express creaHvity, especially when painHng the brown patches.
- Provide assistance with culng and gluing as needed to ensure safety.
- Offer praise for efforts and encourage children who may be struggling.
Follow-Up:
- Display the children's giraffe models in the classroom or allow them to take them home to show their families.
- Discuss the different parts of the giraffe and relate back to the vocabulary learned in Part 1.
Image References for Art and Craft product: