My Amazing Face
Age: 2 years old
Class Size: 15 children
No. of Lesson: 3 classes in the whole course
Lesson Duration: 1 hour
Preparation
1. Prepare the story "My Face and My Body" by Liesbet Slegers with illustrations for visual support.
2. Create flashcards with facial features vocabulary.
3. Gather materials for the paper plate face craft
Part 1: Story Introduction and Vocabulary Activity
"My Face and My Body" Story Introduction
Target Vocabulary:
- head
- eyes
- ears
- mouth
- nose
Target Instructions:
- "I have a [head/mouth/nose]."
- "I have two [eyes/ears]."
Learning Objectives
By the end of the lesson, students should be able to:
1. Identify key face-related vocabulary.
2. Engage with the story through listening and participation
3. Demonstrate understanding by pointing to their own facial features
Materials Needed:
- " My Face and My Body" storybook or illustrated printouts
- Facial feature vocabulary flashcards
- Mirror
Lesson Procedure
1. **Warm-Up (5 mins)**: Sing "Head, Shoulders, Knees and Toes" with gestures, focusing especially on the face parts.
2. **Story Introduction (5 mins)**: Show the children the book and introduce the concept of faces and body parts. Ask them to point to their own face. Give out mirror and ask them to point to different facial features on their face.
3. **Touch and Say Game (10 mins)**: Children take turns touching their own facial features while saying "I have a [feature]" or "I have two [features]."
4. **Interactive Reading (15 mins)**: Read "My Face and My Body," pausing to point out facial features and encouraging children to repeat the target phrases.
Assessment:
- Monitor children's ability to identify and name facial features
- Observe participation in interactive activities
Remarks & Reminders for Teachers:
- Encourage quiet children to participate but avoid pushing them to hard.
- Offer plenty of positive reinforcement to support language acquisition and boost confidence.
- Simplify or repeat instructions as needed to ensure comprehension.
- Use expressive gestures and tone of voice to maintain engagement during the story reading.
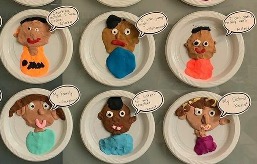
Part 2: Art and Craft Activity
Creating a Paper Plate Face
Learning Objectives
By the end of this activity, students should be able to:
1. Follow simple instructions to create a paper plate face.
2. Develop fine motor skills through cutting, gluing, and decorating.
3. Use the target vocabulary words in context while creating their artwork.
Materials Needed:
- Paper plates (one per child)
- Coloured construction paper / colourful soft clay
- Glue sticks
- Markers
- Pre-cut shapes for eyes, nose, mouth, and ears (Not needed if soft clay is used)
- Yarn or string for hair
Lesson Procedure
1. **Introduction (5 mins)**: Show a completed paper plate face and name each feature.
2. **Creating the Face (15 mins)**:
- Distribute paper plates
- Create features with clay (skip this step is clay is not used)
- Guide children in glueing features in the correct positions
- Help them add details like hair
3. **Show and Tell (5 mins)**: Each child presents their face by pointing to different facial features.
4. **Clean-Up (5 mins)**: Help children organize materials and clean workspace.
Assessment:
- Observe the ability to identify facial features correctly
- Observe the ability to glue and stick facial features confidently
- Monitor participation and engagement
Remarks & Reminders for Teachers:
- Ensure that each child is actively participating and not just observing.
- Assist with difficult tasks like sticking strings, if necessary.
- Provide lots of encouragement and positive reinforcement to boost confidence.
- Use simple language and demonstrate each step before asking the children to do it.
- Keep safety in mind at all times, especially with materials like scissors and glue.
Follow-Up:
- Allow children to take the artwork home to share with their families.
- Encourage parents to talk about the face with their child, using the target vocabulary.
Reference
Image References for Art and Craft product: