.png)
The Snowman
Age: 2 years old
Class Size: 15 children
No. of Lesson: 4 classes in the whole course
Lesson Duration: 1 hour
Preparation
1. Prepare the craft materials for the Art and Craft activity. This includes various shapes (circles, rectangles), craft paper in white and other colors, and glue sticks.
2. Set up tables with the craft materials placed in the center of each table.
3. Create a sample of the snowman craft and place it in a visible location for reference during the activity.
Part 1: Story Introduction and Vocabulary Activity
"The Snowman" by Raymond Briggs
Target Vocabulary:
1. Snowman
2. Snowball
3. Round
4. Scarf
Target Instructions:
1. "Point to the..."
2. "Show me the..."
Learning Objectives
By the end of the lesson, students should be able to:
1. Recognize and respond to the target vocabulary.
2. Follow the target instructions in English.
3. Enjoy listening to an English story.
Materials Needed:
1. "The Snowman" by Raymond Briggs
2. Projector (for YouTube song)
3. Flashcards (snowman, snowball, round, scarf)
Lesson Procedure
1. **Warm-Up (5 mins)**: Start the lesson with a cheerful greeting. Play the "Hello Hello! Can You Clap Your Hands?" song [link](https://www.youtube.com/watch?v=fN1Cyr0ZK9M) and encourage the children to sing along and perform the actions. This will help them to warm up and get ready for the rest of the class.
2. **Story Introduction (5 mins)**: Show the children the cover of the book and introduce it as today's story. Introduce the target instructions by demonstrating them with flashcards. For example, say "Point to the snowman" and then "Show me the scarf."
3. **Story Time (10 mins)**: Read the story aloud, using a lot of gestures and facial expressions to make the story engaging. Pause after each page to point to the target vocabulary and encourage the students to do the same. Use the target instructions to engage students, for example, "Point to the snowball," or "Can you show me the round snowman?"
4. **Song Time (5 mins)**: Play the song "I'm A Little Snowman" [link](https://www.youtube.com/watch?v=FczqntFwb6k) and encourage the children to dance along. Invite them to move their hands like making a round snowball when the song says, "I'm a little snowman, round and fat." Use the target instructions to guide students during the song, like "Point to your imaginary snowman," or "Can you show me how to make a round snowball?"
5. **Review and Closure (5 mins)**: Review the target vocabulary and instructions. Use the flashcards to ask questions like "What is this?" or "Can you show me the scarf?" Praise the students for their participation and efforts.
Part 2: Art and Craft Activity
Activity: "Making a Snowman"
Learning Objectives
By the end of this activity, students should be able to:
1. Recognize and differentiate basic shapes and colors.
2. Develop fine motor skills through hands-on craft activity.
3. Follow simple instructions to create a craft.
Materials Needed:
1. Craft paper in various colors.
2. Pre-cut shapes (large and small white circles for the snowman's body and head, small black circles for eyes and buttons, rectangles for the hat and scarf in various colors).
3. Glue sticks.
4. Oil pastels or markers.
Preparation:
1. Prepare the craft materials for the Art and Craft activity. This includes various shapes (large and small white circles, small black circles, rectangles), craft paper in different colors, and glue sticks.
2. Also prepare oil pastels or markers for adding details to the snowman.
3. Set up tables with the craft materials placed in the center of each table.
4. Create a sample of the snowman craft and place it in a visible location for reference during the activity.
Lesson Procedure
1. **Instructions (5 mins)**: Clear explanations are key to guiding children through this activity. Show them the sample snowman and explain each step:
- Stick the larger white circle on the craft paper as the snowman's body.
- Stick a smaller white circle on top of that as the snowman's head.
- Stick small black circles as the snowman's buttons and eyes.
- Stick rectangles as the snowman's hat and scarf.
Encourage children to choose their preferred colors for the hat and scarf. Further, explain that after creating the basic shape of the snowman with the cut-outs, they will use oil pastels or markers to draw additional details like a smile or stick arms.
2. **Art and Craft Time (20 mins)**: Allow the children to choose the shapes they want to create with and guide them as they work on their craft. Once the basic snowman shape has been formed with the cut-outs, distribute oil pastels or markers. Assist and encourage the children as they add their own unique details to their snowman.
As you walk around to check on their progress, remember to use a marker to write their names at the back of their creations.
3. **Review and Closure (5 mins)**: Ask each child to show their "Snowman" to the class, asking them questions about it such as "What shapes did you use to make the snowman?" or "What color is your snowman's scarf?" Praise their effort and creativity.
4. **Wash Up (5 mins)**: Guide the children in cleaning up their work area after the craft activity. This is a good opportunity to teach them about cleanliness and responsibility.
Remarks & Reminders for Teachers:
- If the same group of children had the previous lesson - A Snowy Day, the artwork, a snowy scene from last lesson can be used as a background for the snowman made this lesson.
- Use clear, simple language and speak slowly.
- Ensure all activities are developmentally appropriate for the children's age. Allow them to learn at their own pace.
-Provide assistance and positive feedback as needed.
- Use a variety of visual aids and physical activities to keep the students engaged.
- The focus is on exposure and repetition rather than mastery.
- Make the lesson fun and engaging.
- Reinforce learning through repetition and hands-on activities.
- Be gentle with corrections and offer lots of praise to motivate the students.
- Before the art and craft activity, remind the children to roll up their sleeves to avoid staining their clothes.
- Communicate with the parents about when to pick up the artwork - either at the end of the class or in the next class.
- Finally, remember to enjoy the process. Your enthusiasm and enjoyment will translate to the students, making the learning experience more enjoyable for them as well.
Reference
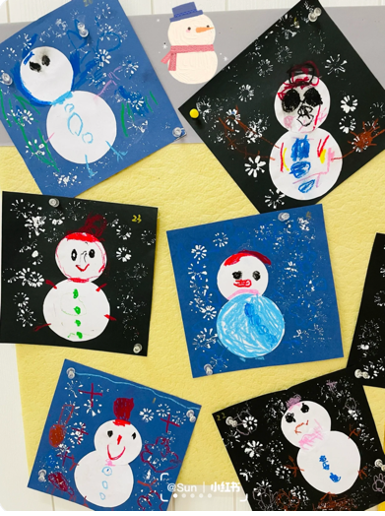
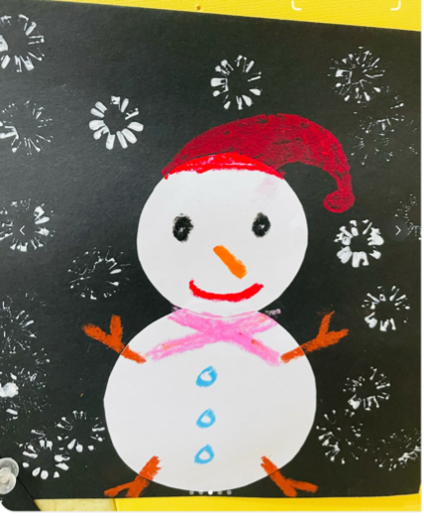
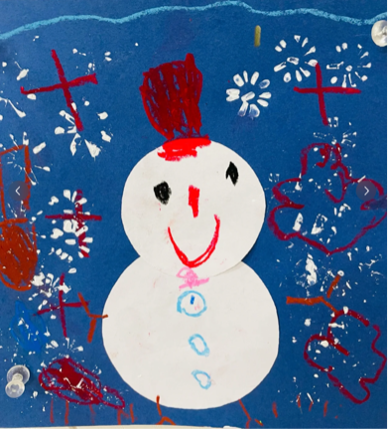
Image References for Art and Craft product: