.png)
Up in the Sky
Age: 2 years old
Class Size: 15 children
No. of Lesson: 4 classes in the whole course
Lesson Duration: 1 hour
Preparation
1. Gather images and toy models of planes, hot-air balloons, helicopters, and airports.
2. Prepare the book "Up Up and Away" for storytelling.
3. Set up a craft area with materials for making simple aircraft models or sky scenes, including blue paper, cotton (for clouds), and colored paper for balloons and planes.
Part 1: Story Introduction and Vocabulary
Target Vocabulary:
- plane
- hot-air balloons
- helicopter
- airport
- sky
Target Instruction:
- “Where is the _______?”
- “The _______ is in the sky.”
Learning Objectives:
By the end of the lesson, students should be able to:
1. Identify and name different types of air transport and related locations.
2. Use the target sentences to describe the position of objects in pictures and in the classroom.
3. Engage with the story "Up Up and Away" through listening and interacting with props.
Materials List:
- "Up Up and Away" storybook
- Images and models of planes, hot-air balloons, helicopters, and airports
- Craft materials for making sky scenes
### Class Details:
1. Warm-Up (5 mins): Begin with a simple song or rhyme about flying, such as "The Airplane Song" to capture the children's attention and introduce the theme of flying.
2. Story Introduction (5 mins):
- Introduce the book "Up Up and Away". Show the cover and ask the children to guess what the story might be about based on the images.
- Briefly explain that they will hear about different things that can fly.
3. Vocabulary Introduction (10 mins):
- Show the children images and models of planes, hot-air balloons, helicopters, and airports.
- Teach each new word by pointing to the corresponding image or model, saying the word clearly, and having the children repeat it.
- Use the target sentences by asking questions like "Where is the plane?" and guide the children to respond with "The plane is in the sky."
4. Interactive Reading (10 mins):
- Read "Up Up and Away", pausing to point out illustrations of planes, balloons, and helicopters.
- Encourage children to use the target sentences to describe what they see in the book, e.g., “The helicopter is in the sky.”
Assessment:
Remarks:
- Keep the energy high and use lots of gestures and facial expressions to maintain the children's engagement.
- Be patient and offer help with the activity, ensuring that each child feels supported.
- Use the target sentence structure conversationally throughout the lesson to reinforce learning.
Part 2: Art and Craft Activity
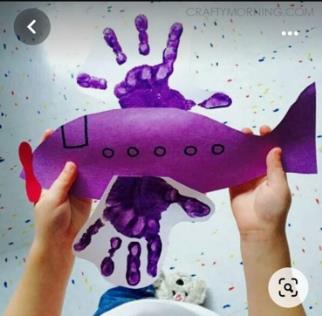
Making Planes
Learning Objectives:
By the end of this activity, students should be able to:
1. Use art materials to construct a simple airplane model.
2. Develop fine motor skills by painting, gluing, and assembling the airplane parts.
3. Apply the target vocabulary in a creative context by identifying parts of the airplane as they work.
Materials List:
- Pre-cut plane bodies (fish-like shapes) made of cardboard
- Paints (various colors)
- Brushes and painting supplies
- Pre-cut handprints for wings
- Pre-cut propellers
- Glue and scissors (for teacher use or with close supervision)
- Markers or stickers for decoration (windows, doors, etc.)
Class Details:
1. Introduction (5 mins):
- Introduce the art and craft activity by showing a completed airplane model.
- Explain each part of the airplane using the target vocabulary (plane, wings, propeller).
2. Crafting the Airplane (20 mins):
- Distribute the pre-cut plane bodies and wings to each child.
- Guide the children in painting their plane bodies and handprint wings. While they paint, encourage the use of vocabulary by asking questions like “What color is your plane?” and “Where is the wing?”
- Once the paint dries, help the children glue the handprint wings to the sides of the plane bodies.
- Assist them in attaching the pre-cut propeller at the front of the plane.
3. Decorating the Airplanes (10 mins):
- Provide markers or stickers for the children to add details like windows and doors to their planes.
- As they decorate, engage them with the target sentences: “Where is the door?” and “The door is on the plane.”
4. Clean-Up (5 mins): Assist children with cleaning up their spaces, putting away materials, and washing hands.
Assessment:
- Observe if children can identify and name the parts of the airplane using the target vocabulary.
- Assess their ability to follow instructions during the crafting process.
- Evaluate their fine motor skills development as they paint, glue, and assemble.
- Gauge their engagement and participation in the activity, noting how they use language related to the theme.
Notes for Teachers:
- Encourage children to express their creativity in decorating their airplanes.
- Provide help with tasks requiring fine motor skills, like cutting or applying small stickers.
- Praise each child's effort and creativity to boost confidence.
- Use clear and simple instructions and repeat vocabulary frequently to reinforce learning.
Follow-Up:
- Display the children’s airplanes around the classroom or in a common area where parents can see them.
- Organize a "tiny airshow" where children can show their airplanes and tell others about how they made them, using the target vocabulary.
Image References for Art and Craft product: